2 Data
Data should be managed and shared properly to make it useful in research, to promote transparency and facilitate reproducibility, and to ensure the credibility of research. This includes such practices as transforming data into a tidy format, storing data in open file formats, and providing data documentation. All emLab data, unless restricted, should be stored in the emLab Shared Drive (location dependent on type of data, see Section 2.2.3).
Recommended readings:
Borer, Elizabeth T., Eric W. Seabloom, Matthew B. Jones, and Mark Schildhauer. 2009. “Some Simple Guidelines for Effective Data Management.” The Bulletin of the Ecological Society of America 90 (2): 205–14. https://doi.org/10.1890/0012-9623-90.2.205.
Broman, Karl W., and Kara H. Woo. 2018. “Data Organization in Spreadsheets.” The American Statistician 72 (1): 2–10. https://doi.org/10.1080/00031305.2017.1375989.
Ellis, Shannon E., and Jeffrey T. Leek. 2018. “How to Share Data for Collaboration.” The American Statistician 72 (1): 53–57. https://doi.org/10.1080/00031305.2017.1375987.
Goodman, Alyssa, Alberto Pepe, Alexander W. Blocker, Christine L. Borgman, Kyle Cranmer, Merce Crosas, Rosanne Di Stefano, et al. 2014. “Ten Simple Rules for the Care and Feeding of Scientific Data.” PLOS Computational Biology 10 (4): e1003542. https://doi.org/10.1371/journal.pcbi.1003542.
Hart, Edmund M., Pauline Barmby, David LeBauer, François Michonneau, Sarah Mount, Patrick Mulrooney, Timothée Poisot, Kara H. Woo, Naupaka B. Zimmerman, and Jeffrey W. Hollister. 2016. “Ten Simple Rules for Digital Data Storage.” PLOS Computational Biology 12 (10): e1005097. https://doi.org/10.1371/journal.pcbi.1005097.
Wilkinson, Mark D., Michel Dumontier, IJsbrand Jan Aalbersberg, Gabrielle Appleton, Myles Axton, Arie Baak, Niklas Blomberg, et al. 2016. “The FAIR Guiding Principles for Scientific Data Management and Stewardship.” Scientific Data 3 (March): 160018. https://doi.org/10.1038/sdata.2016.18.
Also see the resources available at DataONE.
2.1 Data File Naming
“Good coding style is like correct punctuation: you can manage without it, butitsuremakesthingseasiertoread” - Hadley Wickham
Coding styles guides provide teams with a shared language that promotes consistency, improves collaboration, and makes code easier to write as it simplifies the number of decisions we need to make on a daily basis (e.g., do I use - or _ to name this file? ).
All style guides are opinionated and while they all intend to make code easier to read and write, some decisions are arbitrary. Thus, instead of us at emLab creating our own, we want to adopt the “proven and tested” Tidyverse style guide. This styles guide has good advice not only for naming files but also for naming functions, objects, and general best coding practices. We encourage all emLab members to read the guide and work towards adopting it.
When it comes to file naming, best practices include:
- Names should be descriptive and meaningful. Many coding interfaces now have autocompletion tools, so the length of the filename is less of a concern.
- Avoid spaces and upper case letters. Some operating systems are case sensitive so in the interest of collaboration, let’s use only only lower case.
- Use
_to separate words in filenames. Do not use-,., or any other special characters such as= \ / : * ? " ' < > |. - Strive to use verbs for function names.
- If files should be run in a particular order, prefix them with numbers. If you’ll have more than 10 files left pad with zero (e.g., 01_get_data.R)
2.2 Metadata
Metadata is data about your data. It includes information about your data’s content, structure, authors, and permissions to make your data interpretable and usable by your future self and others. EVERY data file should be accompanied by a metadata file.
This includes files that people tend to overlook or think are not useful for the broader team. For example, if you’re using Google Sheets to keep track of literature or data reviews for a specific project, these documents should also have some form of accompanying metadata.
2.2.1 Metadata Standards
We use “readme” style metadata, named _readme_datafilename, and stored in the same folder as the data file.
Create one readme file for each data file. Download and use this template to create your readme file (when one is not already available).
Name the readme
_readme_datafilenameand save as a text file.Format the readme so it is easy to understand (use bullets, break up information, etc.)
Use a standardized date format (YYYY-MM-DD)
We acknowledge that it may not always be feasible to draft robust metadata immediately when a dataset is first uploaded to the emlab/data folder. In this case, a minimal readme file can be created as a temporary placeholder that contains the following information: your name, contact info, a very brief (1-2 lines) description of the data, and a note on how you obtained them. Please refer to the Data Directory subheading for further instruction on how to incorporate this form of temporary documentation into the emLab Data Directory.
For files that may be considered more “internal notes” than datasets (Google Sheets example mentioned above), please ensure that some sort of metadata is present. One alternative to a “readme” file is to create an extra tab on the Google Sheet labeled “metadata”. Here, you can include information on the column names (column 1) and their definitions (column 2). This allows collaborators and team members to easily interpret the columns and use the dataset appropriately.
2.2.2 emLab common data directory
All commonly used emLab data is stored in subfolders of the Data folder on the emLab GRIT storage space (emlab/data). To document these data, we use the emLab Data Directory that includes key, standardized information from each readme metadata file. Every data file in the emlab/data folder has a record (row) in the emLab Data Directory. The emLab Data Directory file contains two sheets: (1) Data directory (the record and standardized documentation for each data file); (2) Metadata (information needed to populate the Data Directory, i.e. the meta-metadata)
In the case of placeholder metadata (as described in the Metadata section), only the following columns should be filled out: folder, filename, contact, and summary. This (mostly blank) row serves two purposes: 1) it retains some of the searchability function for that dataset and 2) it serves as a visual reminder that those datasets are in need of more robust metadata development.
require(tidyverse)
require(knitr)

meta_metadatatable <- read_csv("images/meta_metadata.csv", col_names = F)
colnames(meta_metadatatable) <- c("Column","Description")
kable(meta_metadatatable)
Any time you add a new dataset to the shared emLab data folder and directory, please message the #data-streamlining Slack channel so that others on the team know about the new dataset.
2.2.3 Project-specific data directories
We highly recommend that research teams create a data_overview spreadsheet for keeping track of project-related data (i.e. a separate Google Sheet stored in the project’s Google Shared Drive folder). This centralized document can be used to document project-relevant information and communicate to team members datasets that have already been saved. This document can then be used to guide and simplify data migration to the emLab Data Directory once the project is complete. Suggested attributes include:
- File name
- Folder name
- Source of data
- Link where data was downloaded
- Description of data
- Name of the researcher who downloaded the data
- Data directory entry (complete, in progress, not started, etc.)
- Metadata sheet (complete, in progress, not started, etc.)
2.3 Accessing emLab data in R
This section will go over how to access data stored in the emLab data directories (either the common emLab data directory, or project-specific data directories) using R. We provide instructions for accessing data using R on your personal local machine, or on one of emLab’s GRIT servers.
Accessing GRIT data on your local machine requires you to use the Nextcloud desktop app and set it up as described in the emLab manual. If you haven’t done so already, please complete that section. The GRIT data storage space has already been linked to our emLab
quebrachoserver (and will eventually be to our forthcomingsequoiaserver).Set the base data directory at the top of your code to the location directory lives. You should be able to use the following code snippet to do this, which should work on either your local machines, or on a GRIT server such as quebracho or sequoia. Note that this code will automatically generate the correct directory path if using a GRIT server or a local Mac or Windows machine. If using a local Linux machine, you will need to manually modify this to incorporate your unique user name so that it matches the directory entered in Step 9 above.
# Setting the base data directory in R.
# First determine if system is one of our GRIT servers (quebracho or sequoia).
# Otherwise, set the directory for local machines based on the OS (Darwin, Windows, or Linux).
# Finally, if no conditions are met, set the directory to directly within the default home
# directory.

data_directory_base <- dplyr::case_when(
  Sys.info()["nodename"] %in% c("quebracho", "sequoia") ~ "/home/emlab",   # GRIT servers
  Sys.info()["sysname"] == "Darwin" ~ "/Users/Shared/nextcloud/emLab",     # Mac OS
  Sys.info()["sysname"] == "Windows" ~ "G:/Shared drives/nextcloud/emLab", # Windows OS
  Sys.info()["sysname"] == "Linux" ~ "/home/your_username/Nextcloud",      # Linux OS (use your username)
  TRUE ~ "~/Nextcloud"                                                     # Anything else
)
Now set the project-specific directory. For example:
data_directory_project <- file.path(data_directory_base, "projects/current-projects/test-project-nextcloud/data")You should now be able to read and write data into the project data directory. For example:
penguins <- read.csv(file.path(data_directory_project, "raw/penguins.csv"))Note that you can also always navigate to the data directory in the RStudio viewer pane. To do so, simply click the 3 dots in the viewer pane, and type in the appropriate path.
2.4 Tidy Data
As researchers, we work with data from many different sources. Often these data are messy. One of the first steps of any analysis is to clean any available raw data so that you can make simple visualizations of the data, calculate simple summary statistics, look for missing or incorrect data, and eventually proceed with more involved analyses or modeling.
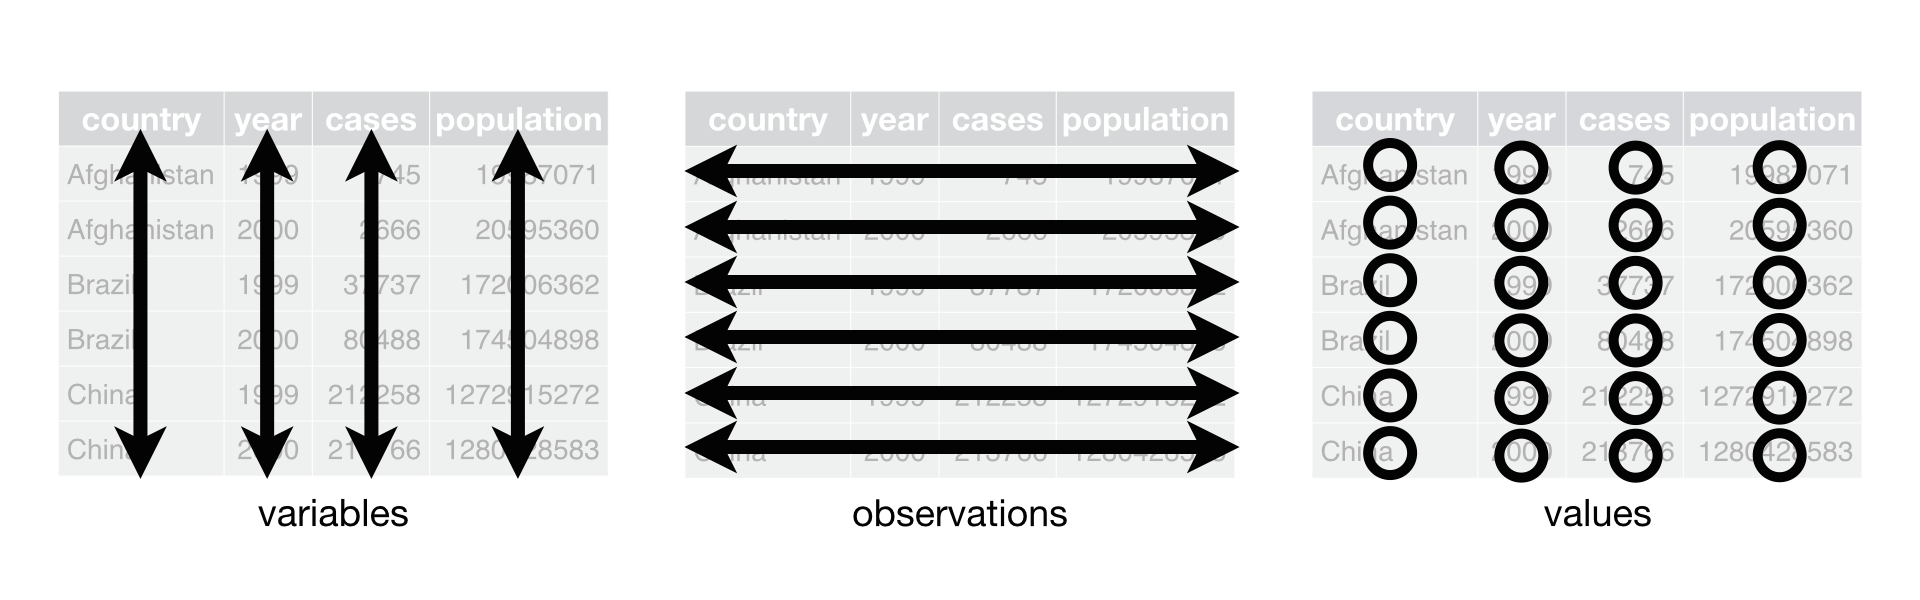
As part of the data cleaning process, we recommend getting all data into a “tidy” format (also known as “long” format, as opposed to “wide” format). According to the Tidy Data Guide by Garrett Grolemund and Hadley Wickham, tidy data is defined as:
- Each variable must have its own column.
- Each observation must have its own row.
- Each value must have its own cell.
These three features of tidy data can be seen in the following figure, also from the Tidy Data Guide:
Once data are in this format, it makes subsequent visualization and analysis much easier. If you’ve ever worked with a file that has a separate column for each year (an example of “wide” format data), you know how hard that type of data format is to work with!
As always, we recommend keeping a backup copy of the raw data you obtained from the original source, and using a reproducible script for transforming these data into a tidy data format.
2.4.1 Recommended Resources
We highly recommend the chapter on Tidy Data from the book R for Data Science by Garrett Grolemund and Hadley Wickham. This guide is geared towards R users and provides helpful tips for transforming and working with data in R, but the concepts should be broadly applicable to other languages as well. For tips specific to Python, we recommend a blogpost by Jean-Nicholas Hould titled Tidy Data in Python.
2.5 Data Formats
Data should preferably be stored and/or archived in open formats. Open formats maximize accessibility because they have freely available specifications and generally do not require proprietary software to open them. The exact format will vary depending on the file type, but some common examples are comma separated value (.csv) as opposed to closed format Excel spreadsheets (.xls) for tabular data, and .pdf or .odt (Open document format for office applications) as opposed to Word documents for final versions of reports.
When saving final geospatial products, we recommend geopackage (.gpkg) which has several advantages over the commonly used shapefile format (more here):
- Single file
- Open format (shapefile is ESRI-dependent)
- Fewer limitations: e.g. no limits on attribute file names (shapefile has max. 254 characters), max file size 140 TB! (shapefile max. 4GB).
Geopackage files can be written and read in R, QGIS, and ArcGIS.
2.6 Data Use Agreements and Confidential Data
2.6.1 The process for establishing a Data Use Agreement or Non-Disclosure Agreement
- At project launch, the project manager and the rest of the project team should determine if a Data Use Agreement (DUA; common) or Non-Disclosure Agreement (NDA; not common) is necessary. Any project that will involve the use and sharing of data that is not publicly available should establish a DUA or NDA.
- Start this process right away.
- DUA is preferred if possible; only do NDA if necessary or requested by partner.
- These agreements should go through UCSB’s Office of Technology & Industry Alliances (TIA).
- This page provides guidelines for establishing a DUA. The first step in establishing a DUA is to fill out a DUA Request Form and send it to Jenna Nakano (nakano@tia.ucsb.edu).
- This page provides guidelines for establishing an NDA. The first step in establishing an NDA is to fill out a NDA Request Form and send it to Jenna Nakano (nakano@tia.ucsb.edu).
- CC emLab’s Amanda Kelley (aekelley@ucsb.edu) on all emails relating to the DUA or NDA.
- Once a request form has been sent, TIA will help produce standardized agreements that are based on answers to these forms. Alternatively, TIA can also review DUAs or NDAs that partners share.
2.6.2 Data storage options
- emLab is generally happy to work with partners to determine the most appropriate method for data storage. Some partners may have specific data storage requirements that will be laid out in the DUA or NDA.
- If the DUA or NDA does not have specific data storage requirements, we recommend one of the following three approaches depending on how sensitive the data are:
- For data that are not confidential or sensitive, data should be stored in a project-specific directory on the emLab Team Drive. Only emLab PIs and full-time emLab staff will have default access to this data directory. Any additional access for postdocs, students, or other external collaborators will only be granted on an as-needed basis and only after the collaborator has read the DUA or NDA. This option is used for the vast majority of emLab projects.
- For confidential or sensitive data, the primary recommended approach is the UCSB Knot Cluster through the Center for Scientific Computing.
- We recommend using this approach if your DUA or NDA allows for it.
- To set this up, use the request form here. Nathan (Fuzzy) Rogers (Research Computing Administrator, fuz@mrl.ucsb.edu) and Paul Weakliem (CNSI Research Computing Support, weakliem@cnsi.ucsb.edu) are good resources for questions.
- Anyone storing sensitive data with the knot cluster should ensure that UCSB locks the data so that they remain private.
- For confidential or sensitive data, the second option is storing data on the Secure Compute Research Environment (SCRE) at UCSB’s North Hall Data Center. The SCRE “is a private, secure, virtual environment for researchers to remotely analyze sensitive data, create research results, and output results and analyses.”
- We only recommend this approach if your DUA or NDA requires data be stored in a secure facility like the North Hall Data Center
- Setting up an SCRE gives you access to a secure virtual desktop that comes pre-loaded with applications such as R and R Studio.
- You can make a request for an SCRE using the request form here.
- UCSB IT will help set this up. You can follow up with questions at scre-support@ets.ucsb.edu
- Requests are usually fulfilled within one week.
- Further information can be found in the SCRE user guide. Jennifer Mehl (Information Security Analyst, jennifer.mehl@ucsb.edu) is another good resource for questions.
- The SCRE has a number of important limitations: it is relatively slow; it is very difficult to access for non-UCSB collaborators; it can only be set up after the NDA/DUA is established; it can be difficult to install Stata and may require an individual license; any non-standard R packages need to be installed manually by a UCSB person managing the SCRE
2.6.3 Other best practices
Regardless of the data storage option chosen, we recommend several additional best practices:
- High-level metadata for all datasets should be added to the _emlab_data_directory. See this section in the emLab SOP for further description of the emLab data directory. This will help emLab be internally transparent in how we are using data for different projects, even if the entire group doesn’t have access to the data.
- For datasets that are confidential, ensure that the “Permissions” column is set to “Secure = confidential data and likely involves a DUA or NDA.”
- Researchers should consider anonymizing individual-level data before publicly releasing the data (see this R package as one example for how to do this).